I love to organize things. I don’t know what it is about controlling clutter, but it really brings me a sense of calm. I am a firm believer of “a place for everything and everything in its place” and my pantry is no exception. You may remember that late last year (while 8 months pregnant), I dove into a full-scale pantry renovation (see it all here).
What I didn’t share in this process was how I organized everything that was inside and on my shelves. Cabinetry, pull-outs and plenty of shelving is no use if it’s still a pile of clutter. That’s why I’ve partnered with my friends at Bed Bath & Beyond to share the products that I love for keeping my pantry organized!
Step 1: Start With a Blank Slate
For me, step one of organizing my pantry is to take everything out. Sort through everything you’ve got in there, check expiry dates and toss anything that is past due. Also determine if you plan to consume some of the non-perishable items in there – if not, make up a box for your local food bank!

Step 2: Assess Your Space
It’s important to take an assessment of the space. I recommend asking yourself a few questions:
- How much space do you have?
- What do you need/want to store in this space?
- Can some items be stored elsewhere?
- Which items do you access most frequently?
This is a good time to take some measurements to get a sense of the space you have to work with. You’ll need these measurements when determining which organizers, bins and other containers to purchase.
My Tips For An Organized Pantry
I’m going to interrupt this process with a few little tips. I’d hate for you to read through this and feel completely overwhelmed so I’m sharing what I personally love in hopes that it will work for your spaces, too! I have pull-outs in my pantry, but those drawers can get overwhelmed with clutter in a hurry. Here is how I stay organized:
Tips For Storing Food & Snacks:

Use Clear Bins: Clear bins are my favorite because you can see what’s inside of them without any fuss. I like that bins serve as drawer dividers that can be removed and washed out when necessary.
Label Whatever You Can: I like to label things whenever I can because it makes life easier. It’s not only easier to find things, it makes it easier to put things away, too.
Decant When Necessary: I hate having a ton of cardboard boxes taking up space in my pantry! For items like granola bars, protein bars, food pouches, drink packets, etc. I like to decant them from their original boxes and keep them in a bin of like-items.
Tips For Storing Dry Goods:
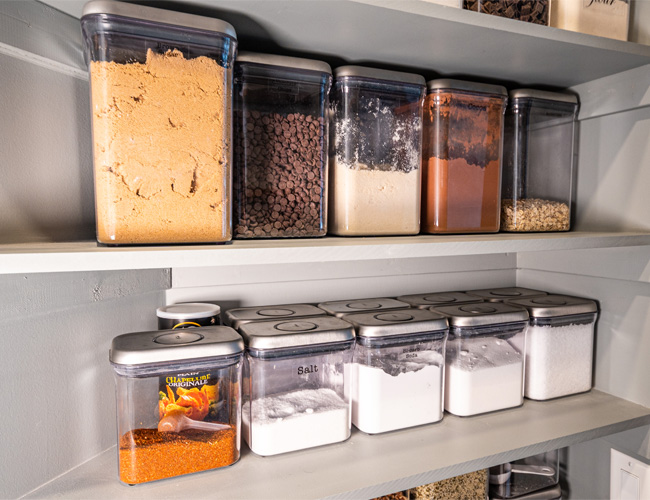
Decanting Dry Goods: I like to decant my dry goods into sealed containers. I have all of my dry goods in various sized containers, but they are the same container style for the sake of uniformity. This keeps things from looking messy. Dry goods also stay fresher longer when stored in this way.
Label Your Containers: Dry goods can start to look alike, especially things like baking powder, soda, cornstarch, flour, etc. so be sure to label them appropriately. I used a set of labels with the same font for uniformity.
I’ve mentioned uniformity here a number of times. Keeping things in a similar “set” of containers is really what helps things to appear more tidy, especially on open shelving. I feel like this investment was worth it. Ask anyone who has visited my home and they will tell you that I am obsessed with these!
Shop: OXO Good Grips POP Food Containers
Step 3: Make a Plan
I am a huge lover of the “planogram” – a concept used in visual retailing. Basically a planogram lays out where everything goes (i.e. a place for everything!). I love to draw out my space on paper and then start listing where everything goes. Sometimes I even use tiny post-its so that I can move categories around a little bit, too.
This analog “tool” allows me to determine where I’m going to fit everything so that I can then determine how I’m going to make it fit. It also helps me figure out what I need to buy! Some may use fancy software to make these determinations, but for projects like these, a little kindergarten artwork can go a long way!
Step 4: Go Shopping!
This might be one of the most fun steps in the process – shopping for the items that you need. Bed, Bath & Beyond has a glorious selection of home organization products both in-store and online. Here are some of my favourites:

Shop: Narrow Clear Bin | OXO POP Containers
Storage Bin Set | Medium Clear Bin
Step 5: Execute & Put Everything Away
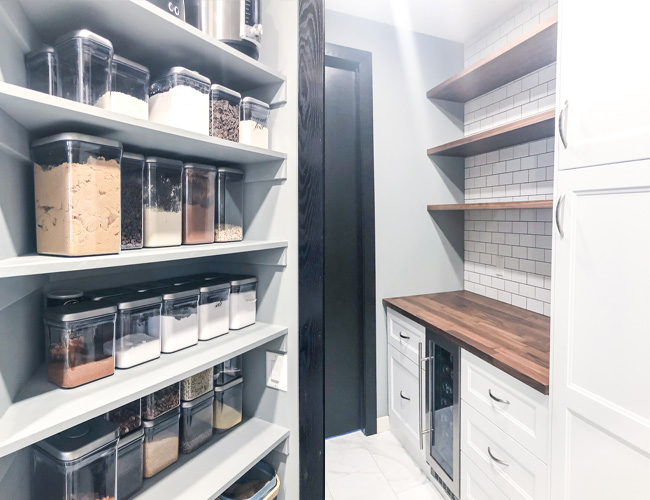
Now is the time to put everything away. You’ve got your bins and canisters and containers and everything else you need to execute your plan. Be sure to keep similar things on the same shelf/in the same drawer. I like to keep all of my dry goods on open shelves, decanted in containers. I keep all of my snacks in bins in my pantry pull-outs. Here is a peek into my pantry:

I’ve Got Your Back!
Still feeling a little bit intimidated? A bit overwhelmed and not sure where to start with your own pantry? Let me help! You can always reach out to me with questions and photos of your own pantry! Head over to the contact page for more!


